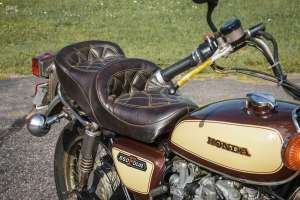
They say that perfection is the enemy of progress, and while you might see a bike that has cruddy cases and old brown paint, I see a phoenix that’s risen from the ashes. What was once a $400 clunker requiring heavy visor tint to be seen on is now a retro hoonmobile that remembers just enough of where it came from. It’s no restoration, but I’d call it a great example of how to repurpose and refurbish on a budget.
Nine installments and countless hours have made this machine what it is, and since the process took a little longer than I care to admit, I’ll understand if you missed a few steps along the way. We took deep dives into jobs like rebuilding suspension, lacing wheels and fabricating parts, and now that it’s all said and done, it seems fitting to look back on the journey.
Since I used up all my best tech tips the first time around, this one’s purely for kicks, and I’m unloading all the jokes and honest truths I left out. This bonus installment is best enjoyed with a cold one…
Part 1: The Worst Motorcycle on Bike EXIF
While there was little in the way of physical progress in our first installment (I may have degreased the bike before dragging it into the shop), I did have my work cut out for me. I had to introduce you, dear reader, to the brown liege (the cheapest complete motorcycle we could get our hands on) and explain why you were seeing this pile on Bike EXIF.
Our friend Ken at Cycle X had the bike listed for sale, and our plans to do something cool with it had warmed over his icy heart. He knocked a couple hundred off the price for us, and $400 got it home. While the bike was every shade from brown to rust, this decrepit old Honda proved to be really good where it counted.
We’d been working on the bike behind the scenes for a few weeks at this point, and had already had Motogadget, Bridgestone, Lowbrow Customs, Tuffside Seats and Biltwell on board. The parts were piling up, but we really only had a rough idea of what we wanted to do. We didn’t have fancy CAD mockups or even someone around the shop talented enough to sketch something on paper, and that had me wondering: can we actually make this all work together? Only one way to find out… [More]
Part 2: The Question No One was Asking
If you know these bikes, then you know I was padding my stats with this one. Of course the CB550 would run; it’s a Honda, but I needed the engine to show signs of life before we tore the bike down any further. I think I marketed this installment as ‘a loose order of operations for verifying that your latest bargain-buy motorcycle is worth reviving,’ an excellent bit of jargon if I say so myself.
You know the drill, I checked the oil, gave it 12 volts, verified spark and shot some two-stroke mix right through the Kehins. Naturally, it fired right off, and I think the most shocking thing was that the points didn’t even require any attention. I know this is basic revival stuff, but the motorcycle had been sitting for 42 years, and it just fired up and ran.
It didn’t run long, considering the ad hoc fuel delivery method, and the loose-hanging exhaust pipes shot out all manners of pine needles, acorns and other foliage for the duration it ran. But alas, we answered the question no one was asking, and could proceed with tearing this thing down. [More]
Part 3: I Know the Pieces Fit
Maybe I was getting ahead of myself, but this was when the project really came alive for me. After tearing the bike down to the point where we had the basic frame, suspension, wheels and fuel tank, I started working with the parts we had on hand to get an idea of how this thing would come together. Installing the tracker bars from Lowbrow Customs was an excellent bit of cheap and easy satisfaction, but fitting our Tuffside universal Street Tracker seat would require the angle grinder.
By the end of this installment, the seat was on the bike, but it still wasn’t fitting right. It was enough to sell me on keeping the stock fuel tank, but I had more hours of cutting, welding and fitting in my future. [More]
Part 4: Building Wheels for Dummies
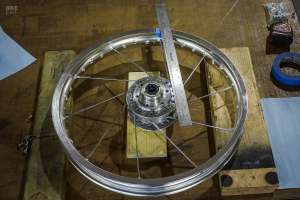
Most riders worth their salt have mounted tires before, but lacing new wheels is a whole different ball game. I’m not sure if I revealed this at the time, but this process was entirely new to me, and the most experience I had with spokes was straightening bent wheels back in my BMX days. And spoiler alert, I wasn’t very good at it.
After going down a rabbit hole on the internet, I was more confused than ever, but the process actually turned out to be fairly straightforward when you get down to it. Some spokes are inside spokes, some are outside spokes, and it’s pretty easy to do once you establish your pattern. With the wheels loosely assembled, we moved over to the fancy truing stand to make them straight.
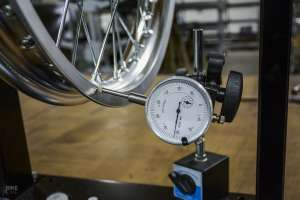
Did I say fancy? Our setup was anything but fancy, consisting of a Harbor Freight wheel truing stand and a magnetic-base dial indicator (also from Harbor Freight). Man, did it get the job done, though, and I was able to get our el cheapo aluminum rims trued to near perfection. The lesson here: don’t be afraid to try new things, even with the cheapest tools money can buy.
With the wheels finished, I was able to remind myself of just how much I dislike mounting tires. I just find it to be a pain, especially so when you mount one backwards and have to redo it. [More]
Part 5: Riveting Readers with Rebuilt Suspension
I was in the mood for another easy win after the long saga of building new wheels, so I turned my attention towards our rusty, blown-out suspension. The rear would be no sweat, as it would be as simple as bolting on some fresh rear shocks. I hoped to get my hands on some spiffy Öhlins or TFX coils that Wes gets to play with, but it wasn’t in the cards. We ended up with some budget-friendly reservoir shocks from Tec Bike Parts, and I don’t hate them. The preload adjustment would come in handy later, but I sure could use a knob for rebound.
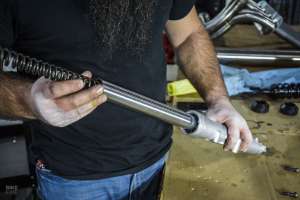
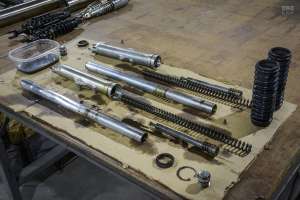
With the easy thing done, it was time to tear down the crusty and disgusting fork. Despite the mess, these things come apart pretty easily if you know what to look for. The parts were in rough shape, though, as the fork lowers were so pitted that I stuck them in the bead blaster to clean them up. A quick spit shine with WD-40 and Scotch Brite, and they were looking good for reassembly with new seals and thicker oil.
While it’s a messy job, rebuilding your forks is an excellent opportunity to improve your ride, and it’s a task you shouldn’t shy away from for lack of experience. [More]
Part 6: Fabrication and Wheel Bearing Exposé
My intention was always to keep the installments on this build orderly, with each part covering concise aspects of the build. But eventually you find yourself with a bunch of random crap to do, and a bossman hassling you for the next chapter of the CB550 story. I had photos of all sorts of minor tasks, and Wes told me to call it “All the Small Things,” which I thought was brilliant.
The work started with new wheel bearings. The old ones weren’t that bad, but I crashed a bicycle when I was a kid after my first attempt at rehabbing wheel bearings, and I guess you could say that experience is still with me today. It’s a pretty simple task on a Honda, and I think we showed a few cool tricks for getting this done on your own.
After that, we axed a bunch of tabs off the frame that we wouldn’t be using and revisited the fitment of our Tuffside seat. My goal was to get this thing to sit absolutely flat on the rear subframe, and we ended up reshaping the rear hoop to make it happen. We also cut out and reshaped part of the frame where the seat hooks up front. Now, the seat fits flawlessly. It sits tight on the subframe and flows perfectly with the bottom of the fuel tank. When you butt hits this seat, it 100% has the feel of an OE install.
That said, I think my proudest moment of this installment was the front fender. I had mentioned several times that the fender didn’t match the radius of our larger Bridgestone Battlax AX41 tire—it was just too long and crappy. So we cut it apart, slicing off both ends and welding them back on after shortening the middle. That preserved the wired edge for an OEM appearance, and the radius now suits the bike perfectly. [More]
Part 7: I’m Not a Fabricator
If you revisit one installment from this whole deal, please, let it be this one because it burned me out. I had some lofty metalworking goals here, and since I clack a keyboard all day, it took me an eternity to finish them. The suffering started with our crusty aftermarket exhaust.
“The exhaust on your classic motorcycle speaks volumes (heh), but in the case of our dirt-cheap Honda CB550, our rusty old aftermarket pipes told a tale of damp storage and trends passed.”
Look, I’m sure you’d be hot shit rolling up to the function with these trombones back in the day, but the look wasn’t doing it for me in 2024, and the rust wasn’t helping. I reasoned that the pipes could look the part with a subtle rework, which involved cutting some length out of the pipes and fabbing up reverse cone tips. The combination of rough old 20 ga. steel and a big ol’ Millermatic 350 loaded with .035 wire didn’t make the project any easier, but the blending wheel fixes all.
With the pipes completed, I turned my attention to an idea I’d been kicking around since the start of the project—some fly custom aluminum number plates. I probably dinked around with five different cardboard designs before I settled on these, and the bead roller and I were well acquainted by the time it was all over. I finished them off with a quick directional sand and dusted off my pinstripe brushes and One Shot paint for some flair. [More]
Part 8: More Custom Odds and Ends
By now, our Honda was really starting to look like something. While wiring loomed large in my mind, we needed to tie up some loose ends before we crossed that bridge. The simpler tasks ranged from building a bracket for our Motogadget wheel speed sensor to finally axing the bulky center stand. We also built a trick license plate mount down on the swingarm. While this piece from Lowbrow Customs was designed for a rear fender, it retrofitted easily to the swingarm with a little fettling.
I’m also proud of our ‘custom’ Biltwell Punisher XL pegs. These are sweet pegs, but they’re intended for Harleys and didn’t jive with our Honda clevis. We solved the problem by cutting the frame side of our OE clevis and TIG-welding it to the peg side of the Biltwell clevis. Boom, Punisher XL pegs for Hondas.
The last big hurdle was our front number plate, which had several jobs to do. The plate houses an LED we’re using as a headlight, and we punched a couple holes in it for simple LED directionals. But since we were low on space under the seat, we had to find a way to mount our Motogadget mo.unit blue behind the plate. The plate is hinged, so it can be folded down for servicing, and we fabricated a small aluminum box behind the plate for the mo.unit. The final result is pretty slick, and the hinge arrangement allows you to pivot the number plate to aim the headlight. [More]
Part 9: On the Road Again
I was backed into a corner—fight or flight style—and the only way out was wiring. With only electrical separating us from the end of our CB550 tracker build, I called in for reinforcements in the form of two friends more knowledgeable with the multimeter than myself. Okay, I’m embellishing some, as wiring our Honda was pretty simple after I turned up a complete wiring diagram for Honda motorcycles using the mo.unit blue, courtesy of Revival Cycles.
We still had some difficulties along the way, especially with the CB’s ‘starting motor safety’ switch, and I probably rewired the Motogadget mo.switch buttons three separate times. It probably took us a couple days to get it right, but in the end, this system functions flawlessly.
With light at the end of the tunnel, we soldiered through the last few fights our Honda would put up. The brake master puked its guts out, so that needed to be rebuilt, and the engine developed an Exxon-Valdez caliber oil leak from the countershaft seal. Thankfully, these parts were readily available. We also had to source a whole new rack of Kehin carburetors after we found irreparable damage and missing parts—probably the whole reason this bike was parked in the first place.
September 24, 2025, was the day this pile of parts proved itself to be a motorcycle again. The engine lights off with the slightest touch of the start button, and it does everything we could ask of it, from cruising highway speeds to sliding around in the dirt like a flat-track star. Every part of the bike works exactly as we intended, and you could ride this thing all day long and have the time of your life.
For those keeping track at home, that’s 1 year, 11 months and 10 days separating the introduction of our Honda CB550 street tracker project from the point where it was a running, driving motorcycle. That’s probably not something to be proud of, considering we never even tore into the engine on this motorcycle, but that’s not the important thing in my mind. 42 years of sitting, that’s 15,340 days if you break it down, meaning this motorcycle was dead to the world for five times longer than it lived. [More]
Maybe you don’t love everything we did here, or maybe you think we didn’t take it far enough, but everyone loves an underdog story, and I think the transformation from $400 clunker to four-cylinder hoonmobile is something worth celebrating. Anyway, I’ve gabbed enough about this motorcycle. I hope you learned something along the way, or at the very least, found it entertaining. I’ll see ya on the next one, we have more chopping to do.